
Once you have set up hosting with us you will log into your Admin panel. There in the center panel are our easy Get Started Quick Directions. They are repeated here for you below.
- Log into your admin panel. You will have received an email from us with that information. Your admin panel will be located at http://www.yourdomainname.com/storeadmin (if your domain name extension does not end with a dot com then be sure to change the extension.
Your username will always be: admin
Your password will be whatever you set up when you signed up for hosting.
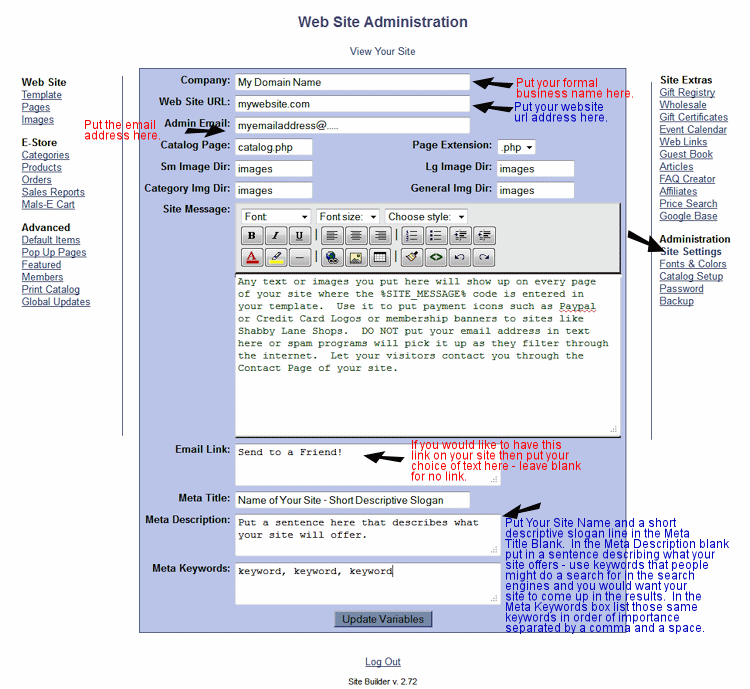
- Find the link on the right side of your Admin Panel that says "Site Settings". Fill in the information as shown below:
- Next go to your Catalog Set Up Page
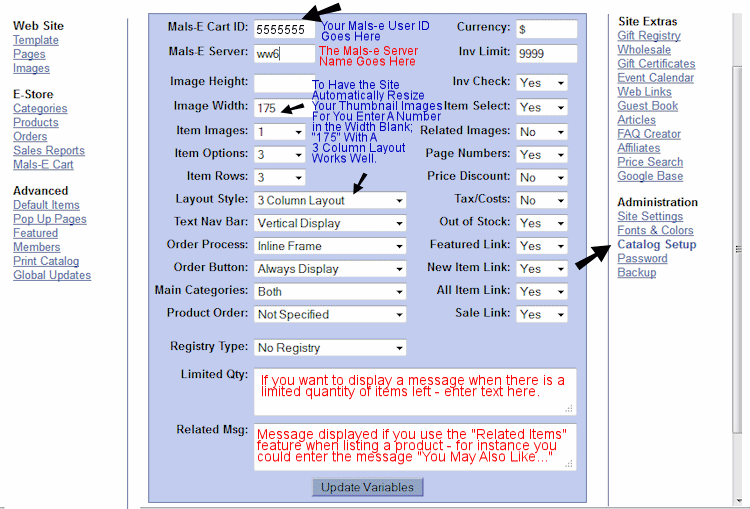
Catalog Set Up Page Explanations:
- Mals-E Cart ID: Your Mal's Cart ID should already be filled in for you here.
- Inv Limit: Inventory messages will display only if the inventory quantity is less than the value entered here.
- Mals-E Server: This Mals-E Server prefix should already be filled in for you here.
- Inv Check: Do you want the system to stop someone from ordering more than the quantity in stock? Set Yes to limit them or No to allow back orders.
- Currency: Enter your currency symbol.
- Item Select: Do not display the item drop down box in the administration area.
- Image Height: If you want to upload online one size of an image to be used for your products then you can set the site to automatically resize that same image to use for your thumbnail images. If you want your thumbnail images to all be one height then enter the pixel hieght that you wish the thumbnail images to be here. NOTE: Unless all of your regular pictures are exactly the same height and width to start with only enter a pixel number in the Height OR Width Box - not both. The site technically "squishes" the image to fit within the constraints that you set here. If you enter a Height and a Width then it may distort your images to make them fit. We recommend that you enter a number in the Width blank only - not the Height as your layout determines how many thumbnail images will fit across the page. Generally if you are using a 3 column layout then "175" works great for your Thumbnail Image WIDTH.
- Image Width: Enter the pixel width at you wish to display your thumbnail images or leave blank to use the actual width of the original image.
- Related Images: Do you want to display images next to each related product?
- Page Numbers: Select Yes to display page numbering (ie. 1 | 2 | 3 ...) or No to just display "Previous" and "Next" links when your products extend over more then one page.
- Item Images: How many thumbnail images would you like to display for each item?
- Price Discount: Do you want to set price discounts (i.e., do you want to give lower prices for multiple item purchases)?
- Item Options: How many options (ie. colors, sizes, styles, etc.) do you want to add per product?
- Tax/Costs: Set this to Yes if you want to log your product cost and add a tax amount for items.
- Item Rows: How many rows of items do you want to display on one page?
- Out of Stock: Select "Yes" to display out of stock items with an "Unavailable" message. Select "No" if you do not want to list out of stock items.
- Layout Style: Choose your layout style that you want your site to default to. You can change this layout style on each Category page if you wish so that you can have different layouts for different categories. Whatever layout you choose on each individual Category page will override this default setting. If you do not change the layout style on the individual Category page then that Category will default to this setting.
- Featured Link: Do you want to display a Featured Item link on your navigation section if featured items exist?
- Text Nav Bar: If you use a vertical link navigation you can choose to display only the main categories (Vertical Display), the main categories and sub categories (Vertical Subcategories), or only the main categories until a category is clicked - at which time the subcategories will appear (Expanded Categories). This field has no bearing on other navigation types.
- New Item Link: Do you want to display a New Item link on your navigation section?
- Order Process: Would you like the cart pages to look like the page is inside your website page? If so choose the inline frame option. Or you can choose the "normal" option and the cart pages will look like they have gone to a different style page. You can set the style and color of your cart whether you choose inline or normal from inside your mals-e cart panel.
- All Item Link: Do you want to display an All Items link on your navigation section?
- Main Categories: When a category has subcategories do you want to display those subcategories with links, display just the products for that category and all its subcategories, or both the links and the products?
- Sale Link: Do you want to display a Sale Items link on your navigation section if sale products exist?
- Product Order: How would you like to order your products?
- Order Button: If you would like to remove the order button set this value to No. Otherwise set it to Yes.
- Registry Type: If you want to include a gift registry on your site make a selection here. Choose a Bridal or Baby registry for a specific registry setup or Gift Registry for a general one that can be used for many occasions.
- Limited Qty: If you want to display a message that will appear when there is a limited number of items in stock enter that message here.
- Related Msg: If you want to display a message that will appear when there are related products for an item enter it here.
Next click on the link titled Pages: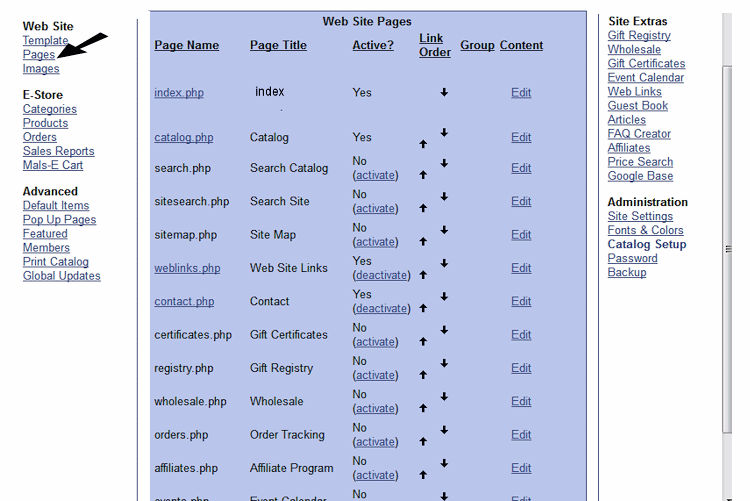
Go down the list of pages that are listed and turn on each page you want to show on your site and turn off the pages you don't want to show on your site by clicking on the "Activate" or "Deactivate" link next to the name of the page. You can adjust the order of the pages by clicking on the up and down arrows and you can add additional pages by clicking on the Add at the bottom of the page. Click on the "Edit" link next to each page to add text and content.
Start with your Home page. Click on the Edit next to the Home Page. A form will pop open that has blanks for you to fill in as below: 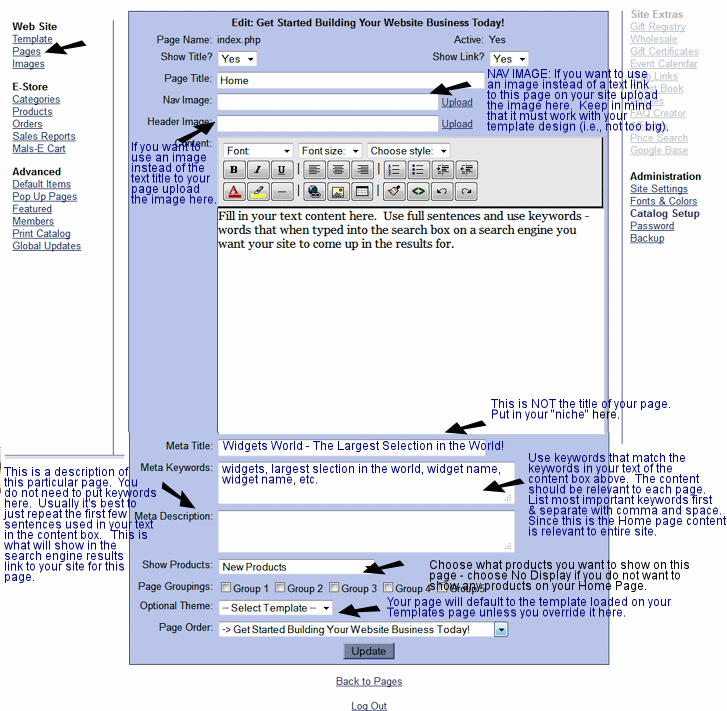
CATEGORIES:
Click on the Categories Link of your admin panel. You will find a list of your current categories (none at first). Click on the Add button and start adding your Categories. When the form pops up fill out the same way you did your Home Page form. Remember that the Meta Title is NOT the name of your category - it is good to use a keyword phrase here that fits this category - something like "Handmade Metal Widgets".
PRODUCTS:
Click on the Products Link of your admin panel. A drop down list will appear of your products so you can always come back and edit them. At first you will not have any products in this drop down list so start adding your products when you are ready. There are three pages to pass through to list your product. You MUST click on the Save or Continue Button at the bottom of each page to complete the listing. When you come back to Edit a product you can just click on the Save button at the bottom of the page you are editing.
Page 1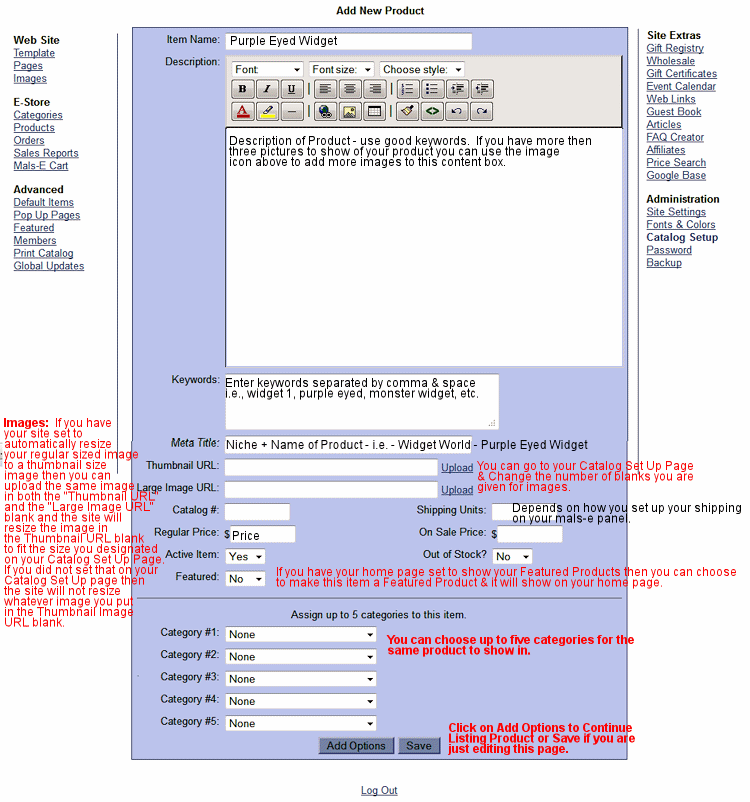
Product Listing Page 2
If you will be offering a product that comes with options such as different sizes or different colors then you will need to use these directions below. If your item does not offer any options then you can skip to the directions for Page 3. 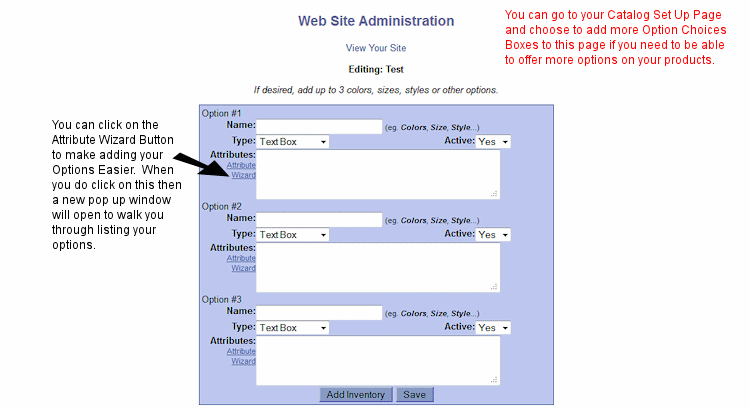
Product Listing Page 3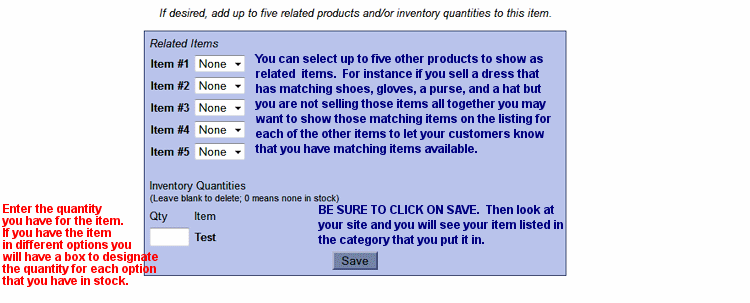
THATS IT! Now you can continue to set up your pages, categories and products on your site. Don't forget that your site can do lots of other things so be sure to browse through the Knowledge Base to find out about the other great features Shabby Lane Shops Hosting offers.